Thursday, September 25, 2014

The perfect Fall drink: Hot Mulled Apple Cider


Oh, Lovelies!

I. L-O-V-E. AUTUMN!!! Especially here in the Hudson Valley. The cool fall air, the changing leaves, apple picking, cider donuts, pumpkin flavored everything, chunky sweaters and boots, and a hot mug of mulled apple cider. I have a deep love for its warm, spicy sweetness and its absolutely intoxicating smell. I only get to enjoy this delicious concoction once a year, when the boughs of gnarly apple trees in orchards throughout the state of New York are heavy laden with crisp, juicy gems of the fall season - apples, apples, apples!

The following recipe is the perfect compliment to a chilly fall day spent outdoors picking apples with friends and family. It's also pretty fantastic served at dinner parties. If you like, you can package up the dry ingredients and give them to guests as the perfect homemade favor for a fall wedding. Pure heaven!


Cristina's Hot Mulled Apple Cider


1/2 teaspoon ground cloves

1/8 teaspoon ground allspice

1/2 teaspoon ground cinnamon

Pinch ground nutmeg

1/4 teaspoon salt

1/4 cup packed brown sugar

1 large orange, sliced

8 cups apple cider


Combine all ingredients in a large pot on your stove top and stir. Heat the cider mixture over medium heat until steam starts to rise from the pot, making sure that it does not simmer or boil. Remove from heat and serve immediately.

Cheers!

XOXO,

~Cristina~


Wednesday, September 24, 2014

Wedding Wednesday: Register on Etsy!

It's mid-week, Lovelies.
 
 I don't know about you, but I need a little pick-me-up! Cue Wedding Wednesday - here to give you a little dose of beauty to brighten your day!
 
Did you know that you can register on Etsy?!...for your wedding...on Etsy! It's almost enough to make me squeal! I love anything custom, artisan, and handcrafted for the home. This is your chance for you and your beloved to curate your new life together with beautiful, one-of-a-kind, handmade awesomeness. I'm pretty sure there's nothing you CAN'T find on Etsy. To get you started I've picked a few fabulous items that I just adore.
 
 
 Anatolian Gift  - Moscow Mule Copper Mug - $22.00
 

Betsy Grace  - Set of 6 typography linen dinner napkins - $68.00


Shevon Gant Ceramics - Handmade ceramic 4 piece dinner set in white and blue - $130.00

 
Cattails Woodwork - Personalized Walnut Cutting Board - $74.07
 
 
Now, go wild! A word of warning, though: You will get sucked in.  
 
 
XOXO,
 
~Cristina~

Tuesday, September 23, 2014

"Will You Be My Bridesmaid?": 10 free printables to help YOU pop the question!


Hello My Lovelies!
 
 I am so excited to bring this post to you today because it combines three very awesome things: DIY, Free Printables, and Weddings! I just love a good deal and let me tell you, this is a good deal, indeed!Are you newly engaged? (Congratulations!) Do you know someone who just got engaged? (Share the goods!). Are you planning on getting engaged... (Even if its just a secret board on Pinterest)? Well, this post is CHOCK FULL of beautiful, free printables and some lovely ideas that will help you when it's your turn to ask the most important ladies in your life-
 
 
 "Will You Be My Bridesmaid?"


1: Creme de la Craft  has an adorable DIY printable to pop the question - An accordion note in a sweet little gift box. Answer: "Awwwww, of COURSE!"


2: Something Pretty has a lovely hand drawn, calligraphed card perfect for the bride who loves a little classic romance.


    3: LOVE vs DESIGN gives us a cheeky and super feminine printable complete with red high heels!


4: Once Wed gives the Modern Bride a bold, geometric design to ask her maids!


5: Bayside Bride shows us how to create a soft and feminine card with lovely lace and ribbon detail.


6: Wedding Chicks help you make your bridesmaids 'official' with calligraphy and flowers.


7: Margot Madison gives us a sweet little rhyme, a bright bouquet, and a DIY bow!


8: The Pretty Blog - Here's a super cute idea - give a set of pretty earrings 
while asking your ladies!


9: Another goodie from Wedding Chicks - A pretty color combo in an awesome font.


10: Dessy gives you ten designs to choose from in a BAGILLION different color combos to match your wedding color scheme. There are even cards for asking your Maid of Honor!


Have fun, Beauties!
 
XOXO,
 
~Cristina~

Monday, September 22, 2014

First Day of Fall...First Cold Of The Season

It's Monday, Lovelies...
 
And it's an absolutely beautiful first day of Fall here in Upstate New York. The only thing is, I'm sick. Nothing out of the ordinary, mind you. Just your everyday, run-of-the-mill sniffle-y, achy, groggy, foggy, stuffy, sore throat, yucky kind of sick! Like most of you, I have a few things I need to feel comfortable when I have a cold and for me that means acting like its the weekend. The weekend represents long hours snuggling (and snoozing) under a blanket on the couch, watching movies on T.V. (Men In Black, National Treasure, The Mummy...don't judge!) and wearing comfy clothes (the most amazing pair of leggings that I have ever owned - and I'm not kidding - came from a bin at Walgreens under a sign labeled "$9.99 ONE SIZE FITS ALL").
 
 Only, when I'm sick, I like to add in some feel good foods like broth based soups and goldfish crackers. I pretty much turn into a 7 year old when I'm sick and I'm A-OK with that. Except for one very grown-up thing I turn to when I'm under the weather. At the end of the day, when I've exhausted my vitamin C, Echinacea, hot tea, orange juice, and chicken noodle soup (and I still can't seem to breathe through my nose) I turn to an old stand-by...the Hot Toddy. It never fails to lull me to sleep and keep me there through the night. 
 
Now, I am no doctor, and I feel the need to say that I do not recommend having more than one of these if you are truly trying to heal from a virus of any sort. Having several will probably make you feel worse when you wake up the next morning instead of well rested, like I do. In any case, I have written the recipe below for you. Cheers, and here's to our health!


Cristina's Hot Toddy Recipe
 
1 1/2 oz. bourbon
1 tablespoon honey
Juice from 1/2  a fresh lemon
Juice from 1/4 fresh orange
 1 Cup boiling water

Combine all ingredients in a mug and stir to combine. Enjoy!
 
XOXO,
 
~Cristina~

Sunday, September 21, 2014

5 Beautiful Things I Am Completely Obsessed With...And How You Can Have Them Too

Happy Sunday, Beauties!
 
I don't know about you, but there are some things that after I see them I just can't get 'em off
my mind. I've created a little collection of some of the lovely items that I have absolutely been coveting from the moment I laid eyes on them. Some are DIY, some are easily bought, and others you may have to take a trip to your local antique shop to find. One way or another, we can have them all! *twirls mustache, greedily* Now, if you'll excuse me, I'm going antiquing for some really pretty finds to showcase on my episode of hoarders!
 
Photo found on Pinterest

Shop this Rose Gold Flatware
 
1 - Kate Spade New York Malmo Rose Gold 5 Piece Place Setting - Available at Macy's 
 
2 - Find this adorable 3 Piece Rose Gold Flatware Set at Target for only $5.99!


DIY Gold Dipped Stemless Glass Tutorial
 
1 - Stemless Wine Glasses - I found mine at my local Dollar Tree
 
2 - Liquid Gold Leaf - Available at Michaels


THE ORIGINAL Adult Sequin Hanger by Pearls and Pastries


DIY Paper Flowers
 
1 - Learn how to make these Coffee Filter Flowers by Just Bella
 
2 - DIY Giant Crepe Paper Roses Tutorial by Studio DIY
 
Photos found on Pinterest

Pink Depression Glass
 
Visit your local antique stores to find all sorts of affordable pieces that you can mix and match. You won't have to look hard for pretty pieces to begin your collection. I, personally, have a deep love (aka: boarderline obsession) for the stuff.
 
XOXO,
 
~Cristina~


Monday, September 15, 2014

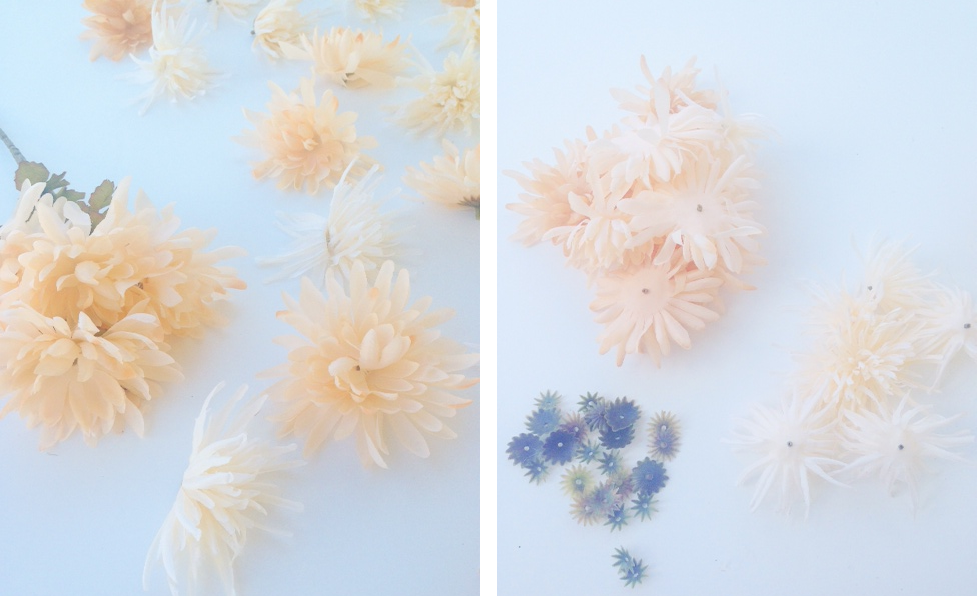
Dollar Store DIY: Flower Chandelier

Lovlies!
 
Have I mentioned that I just LOVE a good DIY project? Well, this one is a triple whammy - super fast, super cheap, super-duper adorable... and it only cost me $11.00 at my local
 Dollar Tree! That's right, E-LEV-EN dollars! Scroll on down and take a look at what you can do for around the price of two venti Starbucks Caramel Frappuccinos.


Ingredients
 
Things I already had:
 
1 glue gun
 
1 can gold spray paint (use any color you'd like) 
 
glue sticks
 
What I bought at Dollar Tree:
 
1 hanging plant basket
 
10 stems of faux flowers
(I bought two kinds of flowers in the same color palette - 5 of each)


Step 1: Separate the chain from your hanging basket.
 
Step 2: Find a very well ventilated space (preferably outside), lay your basket and chain on a plastic garbage bag and spray paint, taking care to cover the entire basket. Let dry completely.


Step 3 : While the paint on your basket is drying, gently pop the heads
 of your flowers off their stems.
 
Step 4: After removing the flower heads pull the green plastic backing from each flower.

 
Step 4: Turn your basket upside-down (with the hole facing up) and
hot glue your flowers to the basket - starting at the base and working your way up to the top.
 

I chose to alternate my flowers for a more varied look.


Step 5: Once you have glued all of your flowers into place, go ahead and clip your hanging chain back onto the basket.


Step 6: Hang that pretty baby up and admire your handy work!
 
This tutorial is for the hanging basket portion only. If you are looking for a lighted chandelier, Ikea sells the SEKOND cord set for a whopping $8.00. All you would need to do is thread it through the hole in the top portion of your chandelier and plug it in....which would put the grand total of this project at $19.00. A steal if you ask me!
 
Now, go and be creative, Darlings! It really is this easy.
 
XO,
 
~ Cristina ~

Thursday, September 11, 2014

DIY Cupcake Decorating: A Sweet Tutorial

Helloooooo, Lovelies!
 
Tuesday night was my first class in Wilton's Cake Decorating Course - Building Buttercream Skills!  We learned the proper techniques to use when piping stars and rosettes and by the end of the class we were able to decorate our own cupcakes!
 
In today's tutorial I will be teaching you, step-by-simple-step, how to decorate cupcakes like a professional! It could not be easier and the results are so lovely everyone will be asking you what bakery you ordered them from!
 
To decorate your cupcakes you will need:
 
Cupcakes
 
1 tub Wilton Decorator Icing
 
Icing Color Gel (any color your pretty little heart desires)
 
1 standard coupler
 
1 piping bag
 
1 #18 decorating tip
 
parchment paper
 
Scissors


~ TO MAKE A STAR ~


Step 1: Mix your Decorator icing and coloring gel until you reach your desired color.
 
Step 2: Twist the ring portion off of the coupler
 
Step 3: Cut the first 1/2 inch off of the tip of your piping bag and place the tube portion of your coupler into the piping bag (making sure it fits snuggly through the cut opening)
 
Step 4: Place your #18 decorating tip onto the tip of the coupler and secure it with the coupler ring
 
Step 4: Fill your piping bag with decorator icing
 
Step 5: Twist the top of the piping bag and slowly squeeze the icing into the tip
 
Step 6: Place the twisted portion of your piping bag between your thumb and your hand and wrap the rest your hand around the bag (holding firmly, but not squeezing)
 
Step 7: Place your piping bag directly in front of you at a 90 degree angle with the tip of the piping bag held slightly above your parchment
 
Step 8: Squeeze the bag firmly and gently until the icing comes out of the tip forming the star shape
 
Step 9: Stop squeezing and pull the piping bag straight up off of the star 
 
Step 10: Repeat until desired design is reached
 
 
~ TO MAKE A ROSETTE ~


Step 1: Make a star as directed above. However, instead of pulling the tip of the piping bag off of the star, continue squeezing bag while making a circle around all points of the star.
 
Step 2: Once a full circle has been made, stop squeezing and pull the tip of the bag off to the side of the rosette (not straight up) to finish.
 
When you are ready to take your new found cake decorating prowess from the practice parchment to the real deal... You can try this:


And the finished product will look like this...
 
 
So lovely, right?!
 
Now, you do not have to use a #18 star tip. You can use a larger tip to create one large rosette on the top of your cupcakes for a more traditional bakery icing look. It totally depends on what you prefer. Whatever tip you choose, HAVE FUN!
 
And there you have it, Darlings! Simple technique with a big impact. Try it out today!
 
 
XO,
 
~ Cristina ~


Tuesday, September 9, 2014

Learning calligraphy: 4 blogs (and 1 magazine) you NEED to check out right now!

 
Happy Tuesday, Lovelies!
 

I have been calligraphy obsessed since I was a little girl. It was always so beautiful and so perfect I felt that that level of artistry was, well, unattainable. I'd heard it takes years and years to master AND to top it off I'm left handed so that brings along its own set of problems (Am I right, Lefties?). I couldn't write like that!
 
Fast forward to a few months ago. I'm standing in my local Michael's Craft Store (my favorite pastime) and I spot a beginner calligraphy set. I came prepared with coupons and my Michael's iPhone app so I had no excuse not to buy it. I picked it up, brought it to the register, paid the cashier and excitedly rushed home to try it out.
 
Let me tell you, it was not easy teaching myself. Learning this craft on your own can be a little overwhelming - there are angles to think about, light pressure on upstrokes, more pressure on down strokes and NIBS (so many nibs), and different styles of fonts to learn! However, it has been a fabulous lesson in patience. It has taught me to be gentler with myself when I have the courage to try something new and the feeling of accomplishment I get when I see what my hands have made is really wonderful..."Did I really make something that pretty?" My non-calligraphy handwriting doesn't even come close.
 
I have practiced (nearly) every day and I have seen great, great improvement. I am currently waiting for my newest pen and nibs to arrive in the mail from Amazon! I can't wait to learn how to write with an oblique pen. Oh, the possibilities!
 
Without further ado, here are my picks for the Top five blogs you need to follow if you aspire to master the art of calligraphy:
 
 
The Postman's Knock - Aside from having a lovely site full of artsy illustration and watercolor tutorials, Lindsey has several free, downloadable calligraphy font worksheets - such as the Beth Style, the Kaitlin Style, and the Flourish Formal Style - that have been invaluable to my learning.
 
Coordinately Yours - Miss Julie Blanner has one of my favorite tutorials on beginner calligraphy! Her photos are bright and pretty and I love the fact that she gives us a printable practice grid for all of our misshapen alphabets!
 
Oh So Beautiful Paper - Nole Garey has put together the most beautiful blog chock full of head spinning inspiration. I come for the calligraphy...I stay for the cocktails!
 
Dasherie Magazine - An entire magazine dedicated to calligraphy!? No brainer. I bought it.
 
Laura Hooper Calligraphy - Laura has stunning photos up on her blog that showcase her incredible hand lettering talents. She also has her fantastic calligraphy workshop that she teaches all over the country. I have been day dreaming about attending her upcoming workshop this December in NYC.
 
 
I hope you find these blogs to be as helpful as I have!
 
Remember, beauty should not be rushed. Instead, it should be relished, stroke by stroke, line by line.


XO,
 
~ Cristina ~

Monday, September 8, 2014

Who Do I Think I Am?: Curating my life through a mood board


Hello there, Lovlies!

I am Cristina. I am a lot of things. For right now I am a… newlywed, former musical theatre actress, recent transplant to the Hudson Valley from New York City, devoted DIY’er, calligrapher in training, designer, watercolor enthusiast, pink bubbly gulper, french macaron devourer, jazz standard shower chanteuse, floral arranger, student of the French language, self-proclaimed foodie, part-time gym goer (I try, I do), Pinterest fanatic, day dreamer, Marylin Monroe admirer and I am currently in the process of changing careers!

Changing. Careers. It sounds so grown up. I have decided to pursue a love of mine – planning and designing parties and special events. This translates to me (after doing loads of research) enrolling in The Wedding and Event Institute’s Wedding and Event Planning, Design and Business Course. When I have completed the course I will be a Certified Independent Event Planner, Certified Wedding Planner, and Certified Wedding Designer! I am so excited I could POP!

A portion of my first assignment has been to create a mood board that describes who I am – a collection of carefully curated photos that showcases my likes, dislikes, personality etc… To be honest, I wasn’t sure if I could possibly sum up who I am in a group of pictures. It is a daunting task asking yourself: “Who am I?”... and I am really, REALLY glad I did it. I came out with a little more knowledge about the person I am (it’s complicated), how I see myself (depends on what day ya catch me), and what means the most to me (my dear, sweet husband and my freakin’ awesome family!).

This is Me!
 
I highly suggest trying to do this on your own sometime – even if you’re not a Certified Wedding Planner in training. For this little project I used the photo editing site PicMonkey and read a fabulous and incredibly informative tutorial on Burnett's Boards about how to make inspiration boards. I have to say it was nice getting to know little ol’ me a bit better than I did before and the older I get the more I come to like who this girl is becoming.
 

XO,
 
~ Cristina ~